CLEVER AutoStart
From PlcWiki
(Automated start using RFID tags and smart watch confirmation)
Implementation documentation
v. 1.2 - 2021-01-25
version note: Workplace tags implemented
1. General description
The main purpose of the AutoStart feature is to start a product on a workplace without its scanning from a paper BoM, but using a smart watch for the confirmation, that an operator registered the new product and is going to work on it. The product is registered on a workplace by a reading of an RFID tag by an RFID reader (antenna). When the tag is read, the CLEVER Client sends a notification to a smart watch and is waiting for the confirmation back. The product is announced to an operator on the smart watch display and by a smart watch vibration. The operator touches the smart watch to confirm his readiness. The smart watch sends a confirmation back to CLEVER Client and the product is started.
2. Marriage workplace
In the very beginning of the assembly line, the marriage workplace needs to be configured. It assigns the RFID tag (mounted on each trolley) to the product (cockpit ID). That workplace is configured in a standard CLEVER Client.
See an important alternative mentioned at the end of this chapter. 
An operator scans the paper BoM to start the product (a standard feature). When the RFID tag is read by a reader, the tag ID is assigned to the started product. An operation “RFID reading” (type Serial) is needed there.
To avoid a situation, when the operator scans the product ID latter than the RFID tag comes to the reader, it is possible to buffer that operation. In that case the order of these events can be opposite. At first the tag is read (and its ID is buffered) and then the operator scans the product ID. The tag ID is taken from the buffer and assigned to the product.
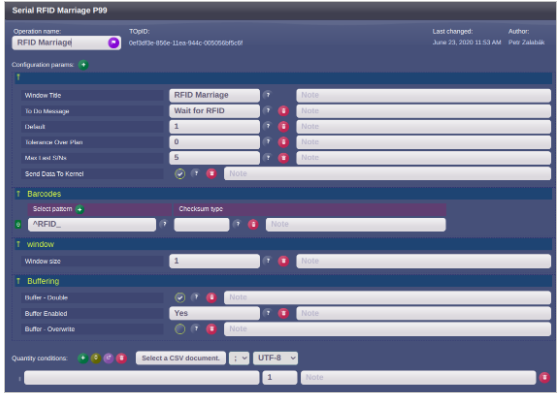
Following parameters are important for the RFID reading (marriage) operation:
| Parameter | Value |
|---|---|
| Send Data To Kernel | Yes |
| Buffer Enabled | Yes |
| Tolerance Over Plan | 0 |
| Default quantity condition | 1 |
Example of the Clea settings of the marriage operation:
 IMPORTANT: The marriage workplace plays an absolutely key role for the entire functionality of the AutoStart system. The 100% reliably working process here is absolutely needed. It is necessary to focus on that workplace from a very beginning of the implementation.
 ALTERNATIVE: Manual scanning of a trolley barcode instead of a RFID reading can be used for the marriage purpose as well. That way gives even a higher reliability of the marriage process. In that case, the barcode content needs to be a fixed prefix “RFID_” and then the tag RFID ID. For example “RFID_D6F92803”. The barcode format can be whichever alphanumeric code, like QR, Datamatrix, Cokde39,…
3. Settings for CLEVER Client
CLEVER Client version required: 2101190928 or higher.
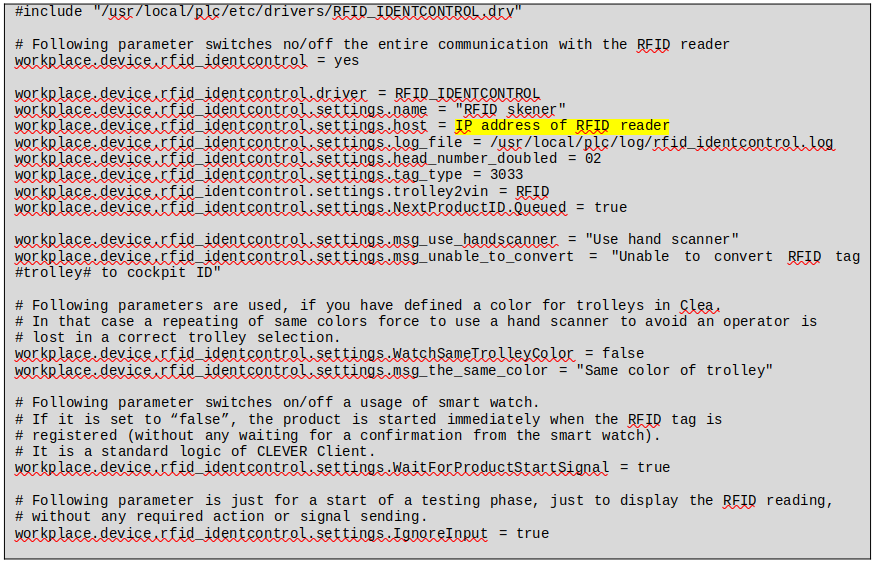
The driver RFID_IDENTCONTROL.drv is needed in the /usr/local/plc/etc/drivers folder. It is possible to update each station to the latest Client version by the following command:
yum update -y --disablerepo \* --enablerepo plc_client plc_client_bins plc_client_drivers plc_client_langs
Each workplace, which will use the AutoStart feature, needs to be configured according to following instructions. The workplaces are configured either individually, or using a workplace tags (described below).
3.1. Workplace parameters
3.1.1. Product ID
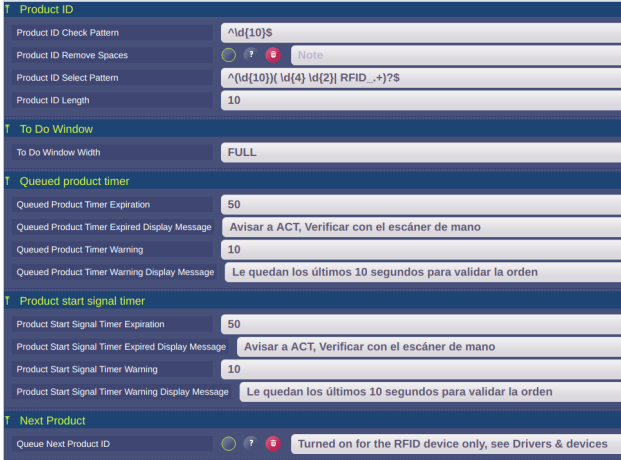
This setting is specific for each plant and depends on a pattern of the product ID. It needs to accept the RFID tag suffix:
| Parameter | Value |
|---|---|
| Product ID Select Pattern | ^(<current settings>)(RFID_.+)?$
For example ^(3120[12]\d{9})(RFID_.+)?$ |
3.1.2. Next Product
In case the RFID tag comes to the reader earlier, then the previous product is finished, it is necessary to store the product id to a queue. The queued product ID is taken from the queue, when the previous product is finished. This is the moment, when the start signal is sent to the smart watch in this case. Because the product ID needs to be queued only in case it is received from the RFID tag conversion, the queueing is defined on the RFID device:
workplace.device.rfid_identcontrol.settings.NextProductID.Queued = true
If the product ID is scanned manually for an assembly sheet, it mustn’t be queued:
| Parameter | Value |
|---|---|
| Queue Next Product ID | No |
3.1.3. Queued product timer
This timer is started when the RFID tag is registered and the previous product is not yet finished. I.e. it starts when the product ID is queued and the Client is waiting for the operator to finish the previous product to send the start request to the smart watch (new-order-ready).
| Parameter | Value |
|---|---|
| Queued Product Timer Expiration | 50 |
| Queued Product Timer Expired Display Message | Examples:
|
| Queued Product Timer Warning | 10 |
| Queued Product Timer Warning Display Message | Examples:
|
3.1.4. Product start signal timer
This timer is started, when the new-order-ready signal is sent to the smart watch. The client is waiting for the confirmation signal from the smart watch.
| Parameter | Value |
|---|---|
| Product Start Signal Timer Expiration | 50 |
| Product Start Signal Timer Expired Display Message | Examples:
|
| Product Start Signal Timer Warning | 10 |
| Product Start Signal Timer Warning Display Message | Examples:
|
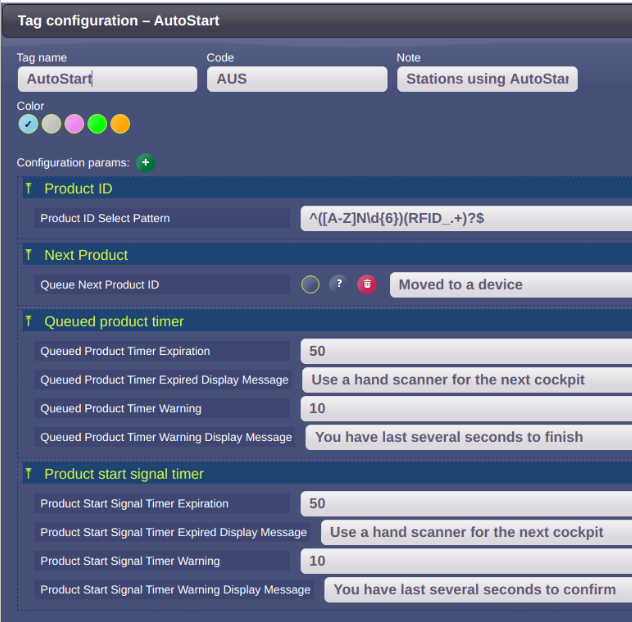
3.1.5. Example of a configuration in Clea:
3.2.Usage of workplace tags
This is a new feature in Clea. Clea version required: 164.210124.14S or higher. The workplace tags provide a possibility to define the workplace parameters just once for a group of workplaces. In our case the workplaces on the main assembly line, which will use the AutoStart option, will be the group.
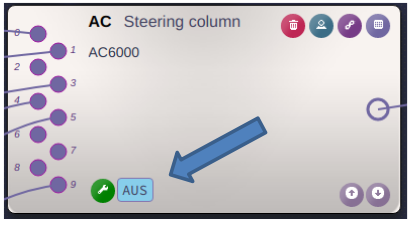
Each workplace can have one or more workplace tags. The tags are indicated in a bottom of the workplace box in Clea:
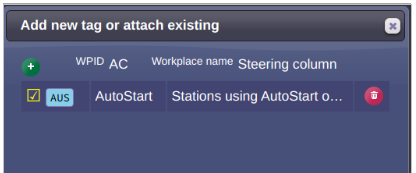
To assign the tag to a workplace, click to the maintenance tool icon ![]() . You will open a dialog:
. You will open a dialog:
By the checkbox, you can assign/unassign the tag to the station.
If you click to the tag code ![]() , you can define the tag parameters. The parameters are accessible from tag code directly on the workplace box as well. See a screenshot on a following page:
, you can define the tag parameters. The parameters are accessible from tag code directly on the workplace box as well. See a screenshot on a following page:
3.3. Settings of Client devices
(application CLEVER Client settings on terminals in Clea):
The devices need to be defined for each station individually.
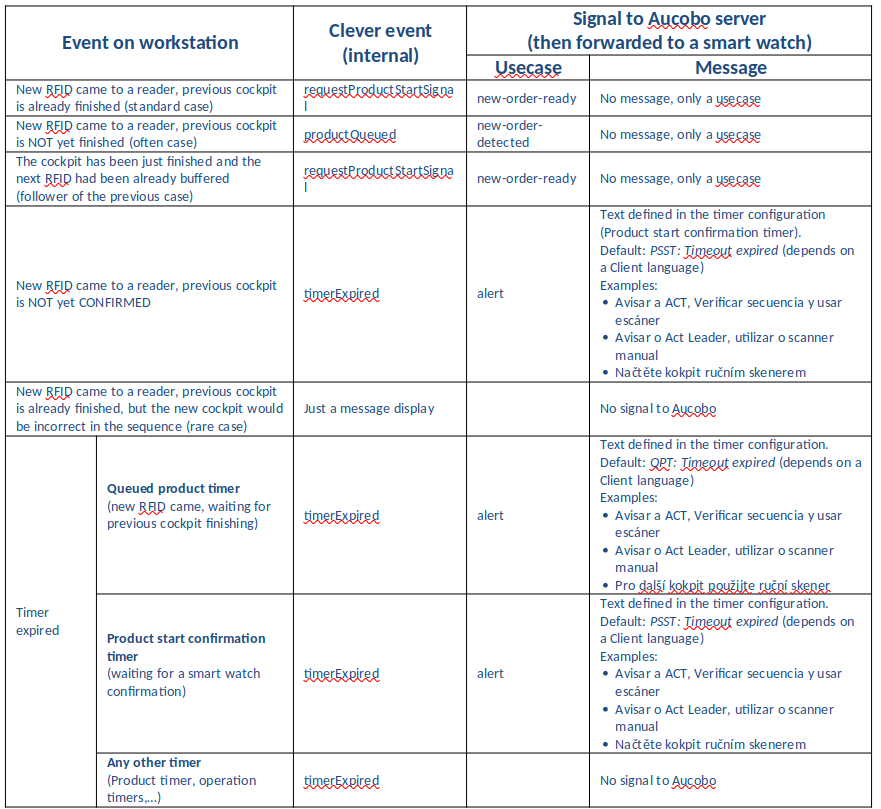
4. Client events sent to smart watch
When and what is sent to the Aucobo system (smart watch):
5. Settings for CLEVER Kernel
CLEVER Kernel version required: 2101190929 or higher
5.1. Client output data register
It is necessary to register Client output data events. This registration will create event files to the defined PMC dirQ. The Client output data register is configured internally by a Clever administrator. File: /usr/local/plc/etc/client_output_data_register/aucobo
Content:
/usr/local/plc/var/pmc/krnl2aucobo_dirq:^(requestProductStartSignal|productQueued|timerExpired)$
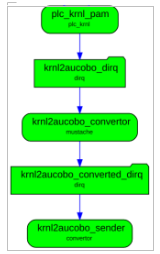
6. PMC dataflow
6.1. Clever  Aucobo
Client output data are transformed by a PMC mustache module to Aucobo format and sent to Aucobo REST interface.
Configuration of PMC dataflow is done internally by a Clever administrator.
For the settings, Clever administrator needs to know:
- IP address of the Aucobo server
- Login credentials for Aucobo REST interface
6.2. Aucobo  Clever
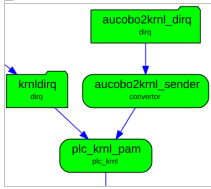
The confirmation signal is received by a Clever REST interface and stored to a PMC dirq. Then it is forwarded to the Kernel. Configuration of PMC dataflow is done internally by a Clever administrator.
7. Clever REST interface
The Clever REST interface is installed and configured internally by a Clever administrator.
8. Trolley database
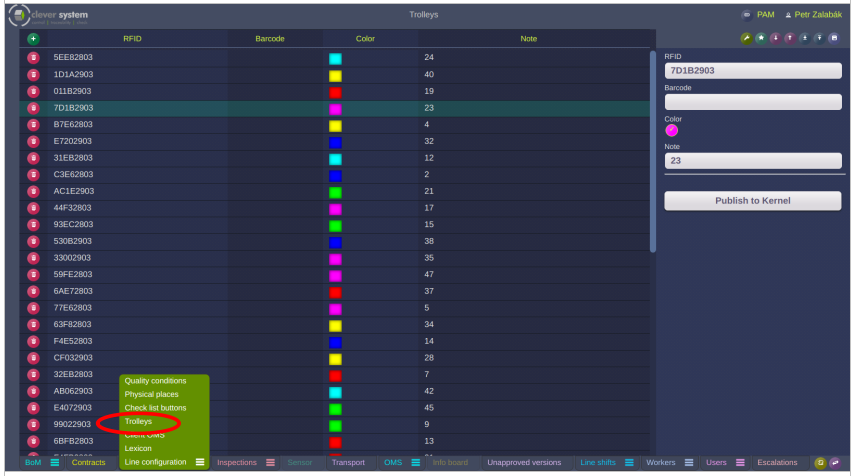
It is possible to define colors for the trolleys. The trolley color is sent to the smart watch, so the operator is able to recognize on which trolley the announced product is placed. If same colors follow each other, then the smart watch confirmation is disabled and it is necessary to use the hand scanner. It avoids a misleading of the operator to handle an incorrect trolley (product). The trolley database is available in Clea:
Clea version required: 163.200911.10S or higher
