Conveyor control
From PlcWiki
Petr.zalabak (Talk | contribs) |
Petr.zalabak (Talk | contribs) m |
||
| Line 138: | Line 138: | ||
== Communication with a conveyor PLC (documentation) == | == Communication with a conveyor PLC (documentation) == | ||
| + | [[Media:CLEVER_and_conveyor_control.pdf]] | ||
Current revision as of 07:38, 22 July 2013
Contents |
General description
In case of defined situations (e.g. a sequence error or a not-finished product) the request for stop of a conveyor of a production line is sent to the conveyor controller. It is a software module, which is running on a computer connected to a conveyor PLC with a serial line or via Ethernet network.
The conveyor can be stopped in these cases:
General events:
- Sequence error
- Not-completed product and the next one is scanned
- The product is sent to rework
- Input event when the operator is not logged in (for example scanning, RFID reading...)
Operation events:(settable for each operation separately) - NOK result of an operation
- Operation input when the dependencies are not satisfied
Timers: - Timeout of a product on a workstation expired (the product was not finished on a station within the time limit). The settings for a timeout timer is described here: Timeout timer
- Timeout of an inactivity on workstation expired (no action taken on a station within the time limit while the product was not finished)
- Timeout of queued next product id waiting in the buffer expired (mostly used for an automatic product ID reading, like RFID tags, trolley numbers...)
The conveyor can be controlled by the Client module generally and/or by individual operations
PLC Client parameters
- line.ConveyorServer = plcgntcs
- line.ConveyorServerPort = 6779
- # workplace.LampToSwitch = 6 // An old and depricated parameter
- workplace.ConveyorID = 21 // ID of the conveyor which is controlled by the workstation
- workplace.ConveyorWSAddr = 0000000000000010 // Workstation address used by the controller to identify a workstation
- WorkPlace.SendConveyorRelease = No | Yes
- WorkPlace.SequenceConveyorControl = No | Yes
- Workplace.Conveyor.SendPID = No | Yes
- Workplace.Conveyor.ReleaseWhenProductFinished = No | Yes
- Workplace.Conveyor.StopWhenIncompleteProduct = No | Yes
- Workplace.Conveyor.StopWhenSequenceError = No | Yes
- Workplace.Conveyor.StopWhenProductTimeout = No | Yes
- Workplace.Conveyor.StopWhenActivityTimeout = No | Yes
- Workplace.Conveyor.StopWhenEventAndNoOperator = No | Yes
- WorkPlace.Conveyor.SendMailNotification = No | Yes (revision v. 10.45.69 1101111624 or above)
- operation.name.SendConveyorStopWhenNOk = No | Yes
Values in bold are the default values.
Delayed conveyor stop
It is possible to set a time delay(s) for the conveyor stop in different situations. Then the conveyor is not stopped immediately, but the defined delay is applied. It prevents the short conveyor stops caused by operator mistakes which can be corrected almost immediately. To define the timers, you can use the following parameters:
# Time in seconds after which the conveyor will be stopped. The default value is 0
WorkPlace.Conveyor.SequenceStopTimer.Expiration = 10
# Time in seconds after which the conveyor will be stopped. The default value is 0
WorkPlace.Conveyor.IncompleteStopTimer.Expiration = 10
There are available the following parameters (not needed if you don’t want to define different values than the default ones):
# Time in seconds before the line is stopped when the WarningWav is being played. The default value is 10
WorkPlace.Conveyor.SequenceStopTimer.Warning = 10

#Default value is /usr/local/plc/lib/ding.wav
WorkPlace.Conveyor.SequenceStopTimer.WarningWav = wav_file_name
# Time in seconds before the line is stopped when the WarningWav is being played. The default value is 10
WorkPlace.Conveyor.IncompleteStopTimer.Warning = 10

#Default value is /usr/local/plc/lib/ding.wav
WorkPlace.Conveyor.IncompleteStopTimer.WarningWav = wav_file_name
Conveyor state displaying
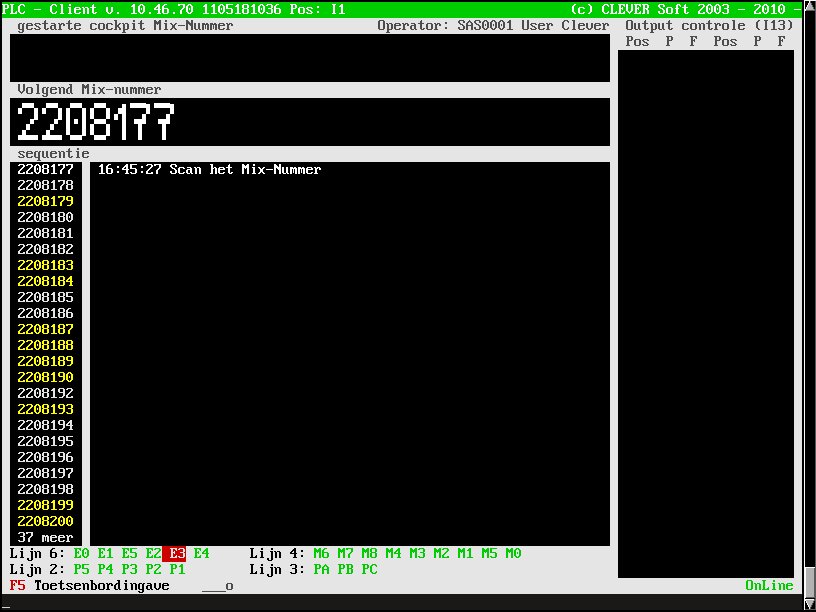
The state of all stations using the conveyor control can be displayed at the bottom of the client screen. If more screen rows should be used, it is necessary to define the Workplace.ConveyorStateDisplay[x].Row parameter for the zone.
Simple example:
WorkPlace.ConveyorStateDisplay = Yes

#include "/usr/local/plc/etc/drivers/RADIO.drv"
WorkPlace.device.plc_radio = yes
WorkPlace.device.plc_radio.driver = RADIO
WorkPlace.device.plc_radio.settings.host = plcgntkrnl
WorkPlace.device.plc_radio.settings.port = 1025
WorkPlace.device.plc_radio.settings.debug_mode = no
Complex example
WorkPlace.ConveyorStateDisplay = Yes
Workplace.ConveyorStateDisplay[0].ConveyorID = 2 // Only the conveyor 2 will be displayed here
Workplace.ConveyorStateDisplay[0].LastColumn = 30 // The value is a percentage of the screen width
Workplace.ConveyorStateDisplay[0].Row = 1

Workplace.ConveyorStateDisplay[1].ConveyorID = 3
Workplace.ConveyorStateDisplay[1].FirstColumn = 30
Workplace.ConveyorStateDisplay[1].LastColumn = 75
Workplace.ConveyorStateDisplay[1].Row = 1

Workplace.ConveyorStateDisplay[2].ConveyorID = 6
Workplace.ConveyorStateDisplay[2].LastColumn = 30
Workplace.ConveyorStateDisplay[2].Row = 0

Workplace.ConveyorStateDisplay[3].ConveyorID = 4
Workplace.ConveyorStateDisplay[3].FirstColumn = 30
Workplace.ConveyorStateDisplay[3].LastColumn = 75
Workplace.ConveyorStateDisplay[3].Row = 0

#include "/usr/local/plc/etc/drivers/RADIO.drv"
WorkPlace.device.plc_radio = yes
WorkPlace.device.plc_radio.driver = RADIO
WorkPlace.device.plc_radio.settings.host = plcgntkrnl
WorkPlace.device.plc_radio.settings.port = 1025
WorkPlace.device.plc_radio.settings.debug_mode = no
Conveyor server settings
Parameters workplace.ConveyorID and workplace.ConveyorWSAddr can be left empty and their values can be defined in one configuration file on the conveyor server. This file is specified in the server configuration file as a parameter:
WSAddrDefinitionFile = /usr/local/plc/etc/plc_conveyor_wsaddr.cfg
and has the following format: WPID: WSAddr @ ConveyorID as for example
M6: 8 @ 4
M7: 7 @ 4
M8: 6 @ 4
M4: 5 @ 4
M3: 4 @ 4
M2: 3 @ 4
M1: 2 @ 4
M5: 1 @ 4
M0: 0 @ 4
I1: 9 @ 5
E0: 10 @ 6
E1: 11 @ 6
E5: 12 @ 6
E2: 13 @ 6
E3: 14 @ 6
E4: 15 @ 6
V1: 16 @ 7
V2: 17 @ 8
EA: 18 @ 9
V3: 19 @ 10
V4: 20 @ 11
EC: 21 @ 12
It enables to send the conveyor state information to client stations (using plc_radio).

