UM
From PlcWiki
Pavelburian (Talk | contribs) |
Pavelburian (Talk | contribs) |
||
| (3 intermediate revisions not shown) | |||
| Line 1: | Line 1: | ||
== CLEVER USER MANAGEMENT APPLICATION == | == CLEVER USER MANAGEMENT APPLICATION == | ||
| - | ''' | + | [[File:Screenshot_2021-02-15_09-28-36.png]] ''' == Czech version == is available at app.clever.cz line: CLEVER Soft, workplace: User management''' |
==1. About this documentation== | ==1. About this documentation== | ||
Current revision as of 09:27, 20 April 2023
Contents |
CLEVER USER MANAGEMENT APPLICATION
![]() == Czech version == is available at app.clever.cz line: CLEVER Soft, workplace: User management
== Czech version == is available at app.clever.cz line: CLEVER Soft, workplace: User management
1. About this documentation
The User Management (um) product provides capabilities in order to manage the users’ access and permissions in the various Clever web applications, from a single point of control. This documentation provides information for the related operators and system administrators on using the User Management web application in order to execute the primary settings for users’ access and permissions to the Clever web applications.
2. Overview of the User Management application window
The User Management application can be accessed either from SAS Menu, by clicking on with the user Management option, or from Clea. For the later case, while you are logged in the Clea click on tab “Users” and then in the link “Open User Management app” on the ride side of the interface under the “Leave a message” option.
The User Management app will open in a new tab of your browser and after your login, the list of users will be displayed with an enable filter for the logged user from Clea.
To disable column filtering :
Click on the filtered column > click on the icon ![]() to reset all filters > close the “Setup column Login name” window > click on “Allow unfiltered records” link
to reset all filters > close the “Setup column Login name” window > click on “Allow unfiltered records” link
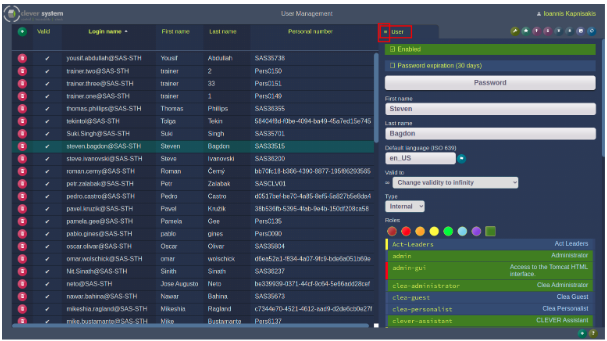
The interface of the User Management app with all listed users will be displayed .
On the left and central part of the interface the list of users is displayed. On the right side of the interface you can view the specified parameters for that user. By clicking on the user options > User groups on the top right part of the interface you can also view the list of user groups as well as the assigned groups for each user.
In the following chapters are described briefly the necessary steps in order to create a user account and manage its parameters.
3. User account
As it was previously mentioned the User Management app is the central point to create and manage user accounts in order to acquire access in the various Clever applications. To do so, a user must be listed under the user management list as well as to have the corresponding roles in order to access the desired Clever applications.
3.1 Create a user account
To create a new user account :
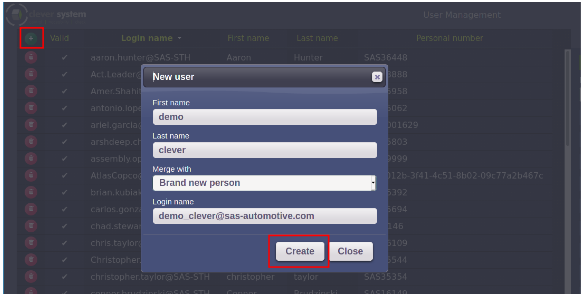
- Click on the add icon located on the top left corner of the application interface to obtain the window “New user”
- Fill the first, last and login name
- Choose to merge with a brand new person
- Click on the “Create” button
![]() NOTE: When you delete a user from the user management app, his first and last name remains in the database (internal Clever HR database). Therefore during the creation of a new user, in case that you will give the same first and last name that already exist in the HR database, these names will be listed in the drop down menu of the field “Merge with”. In case that this new user should indeed have those existing names it is recommended to create the new user by “Merge with” the already existing user names and not “Merge with Brand new Person”.
For instance:
NOTE: When you delete a user from the user management app, his first and last name remains in the database (internal Clever HR database). Therefore during the creation of a new user, in case that you will give the same first and last name that already exist in the HR database, these names will be listed in the drop down menu of the field “Merge with”. In case that this new user should indeed have those existing names it is recommended to create the new user by “Merge with” the already existing user names and not “Merge with Brand new Person”.
For instance:
![]() NOTE: Currently there is a transition phase from sas-automotive to faurecia owner (domain). It is recommended to create new users with the default ownership that it displayed in the “Login name” field of the new user window. Eventually, all users will be under faurecia owner (login_name@faurecia.com)
NOTE: Currently there is a transition phase from sas-automotive to faurecia owner (domain). It is recommended to create new users with the default ownership that it displayed in the “Login name” field of the new user window. Eventually, all users will be under faurecia owner (login_name@faurecia.com)
The new user will be listed under the User Management list.
To finalize the registration of that new user you have to give a user’s password as well as to choose the “Enabled” validity for that user. To assign a new password or change an existing : Click on Password button > Give a new password > click on Save button
The new user is now listed with the “Valid”right as well as his password has been saved in the database.
NOTE : The “Personal number” of a user that is specified from Clea (Users / Workers tab) is also displayed in the User Management app. However, this number can only be defined from Clea.
Lastly, specify the default language for the user, by using the flag icon ![]() , the validity duration of the user as well as the type of the user (internal for faurecia staff, external for non faurecia employee and bot for application user (i.e. user that corresponds to a script). These parameters can also be edited at any time later on.
, the validity duration of the user as well as the type of the user (internal for faurecia staff, external for non faurecia employee and bot for application user (i.e. user that corresponds to a script). These parameters can also be edited at any time later on.
3.2 Assign groups and roles to a user
Next step after the creation of a user is to assign roles or groups of roles to the user such that the user has access to desired applications. A user without, the relevant role, will not either be able to login in the User Management app. There are two ways to assign roles to a user :
- Assign roles one by one from the roles list displayed in the “Users” tab on the right side of the interface.
- Assign roles via the “User groups” tab on the right side of the interface.
Both ways are presented below. However, it is highly recommended to assign roles to a user via “User groups” since this is more practical for the common scenario that a user has multiple roles as well as it gives a better overview for the overall roles of a user.
3.2.1 Assign roles via the “User” tab
To assign roles to a user via the “User” tab :
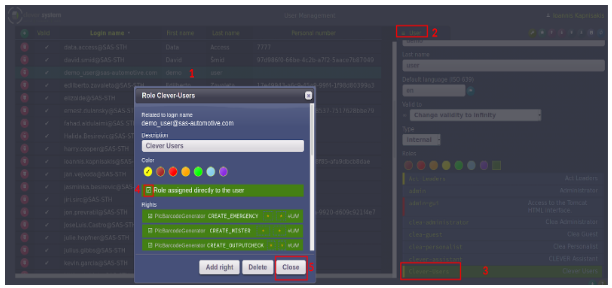
- Choose the desired user from the User Management list.
- Choose the tab “User” on the right part of the application interface.
- Scroll down to the list of roles and choose the desired role by clicking on its name. (The listed colors are used for filtering the roles from the list).
- In the pop up window of the role, choose the option “Role assigned directly to the user”. The corresponding role will be displayed in green background on the roles list.
- Close the window
NOTE: Under the tag “Rights” are listed all the rights (privileges) of the corresponding role. Only root users are allowed to edit these rights. Usage of the “Add right” button is not suggested as it is used primarily by the root users.
![]() IMPORTANT: Be cautious with the Delete button from the window of a role. Deletion of the role will also affect the User groups that include this role. Consequently, this role will be deleted from all relevant users.
IMPORTANT: Be cautious with the Delete button from the window of a role. Deletion of the role will also affect the User groups that include this role. Consequently, this role will be deleted from all relevant users.
3.2.2 Assign roles via the “User groups” tab
To assign a group of roles in a user via the “User groups” tab :
- Choose the desired user from the User Management list.
- Choose the tab “User groups” on the top of the right-hand part of the application interface (Click on User > User groups).
- Choose the desired groups from the list.
The selected groups are displayed in green background. Now the user is assigned with all the roles that are included in these two groups (CLEVER Assistant, Clever Users).
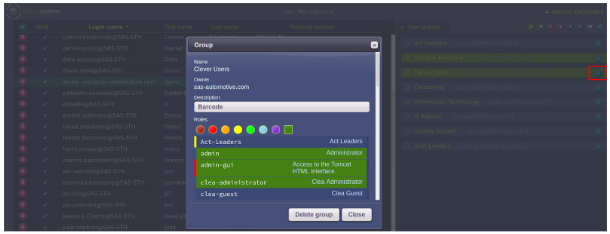
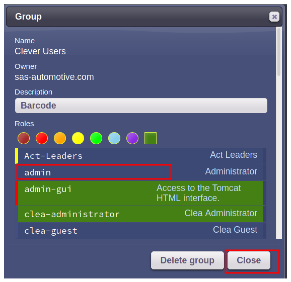
To view the roles of a specific group, click on the corresponding edit icon ![]() of the user group. The window of the group will open with the corresponding roles listed under the “Roles” tag.
of the user group. The window of the group will open with the corresponding roles listed under the “Roles” tag.
To add a role in the group, click on the role name. The selected role will be displayed within a green background meaning that this role belongs to the group. Close the window of the group.
To remove a role from a group click on the name of the role. The role now is displayed without a green background. Close the window of the group.

