CLEA BOM with ATO-model
From PlcWiki
| (3 intermediate revisions not shown) | |||
| Line 7: | Line 7: | ||
[[File:Screenshot_2021-05-06_08-20-34.png]] | [[File:Screenshot_2021-05-06_08-20-34.png]] | ||
| - | The page of “Variants of products” is | + | The page of “Variants of products” is displayed : |
[[File:Screenshot_2021-05-06_08-21-38.png]] | [[File:Screenshot_2021-05-06_08-21-38.png]] | ||
| Line 64: | Line 64: | ||
#Choose the desired product class which will include the product variant or an existing variant of the product class where you want to add the new variant. | #Choose the desired product class which will include the product variant or an existing variant of the product class where you want to add the new variant. | ||
| - | #Use the add button | + | #Use the add button [[File:Screenshot_2021-05-06_08-51-34.png]] on the top left side of the screen. |
#Give the desired variant part ID and name for the product variant. (The “Variant part name” is optional and it will also be displayed in the printed labels). | #Give the desired variant part ID and name for the product variant. (The “Variant part name” is optional and it will also be displayed in the printed labels). | ||
#This field should contain the prefix “IC” with the name of the product class (Product ATO ID) which will contain the added product variant. | #This field should contain the prefix “IC” with the name of the product class (Product ATO ID) which will contain the added product variant. | ||
| Line 91: | Line 91: | ||
To generate these .json files : | To generate these .json files : | ||
| - | + | 1. From the CLEA bottom menu, click in BOM options > Variants of product [[File:Screenshot_2021-05-06_08-20-34.png]] | |
2. Choose a product class and click the button “Export variants of products into Clever MES” on the right side. | 2. Choose a product class and click the button “Export variants of products into Clever MES” on the right side. | ||
| Line 104: | Line 104: | ||
[[File:Screenshot_2021-05-06_11-06-49.png]] | [[File:Screenshot_2021-05-06_11-06-49.png]] | ||
| + | |||
| + | '''Note: This will publish the BOM configurations of all product classes and product variants. There is no option to publish for an individual product variant or product class.''' | ||
| + | |||
| + | The generated .json files will be exported in a zip form (ProductVariants.zip) in the kernel under the directory | ||
| + | usr/local/plc/clea/repo/plcshakrnl:<main kernel of line> , where <main kernel of line> : | ||
| + | 7789 for M3 line | ||
| + | 7787 for MY line | ||
| + | |||
| + | 3. In a final step the cockpit ID label is scanned in the HV station. This enables a process which automatically copies and unzip the zipped file of product variants (ProductVariants.zip) in the kernel under the directory | ||
| + | |||
| + | /usr/local/plc/etc/pmc/product_variants/plcshakrnl:<main kernel of line> , where main kernel of line : | ||
| + | 7789 for M3 line | ||
| + | 7787 for MY line | ||
| + | |||
| + | Via this procedure the information from the BOM file is loaded in the main kernel of the assembly line. | ||
| + | |||
| + | *2.5 Edit and delete product class and product variant | ||
| + | |||
| + | Edit the “Product ATO ID” name | ||
| + | |||
| + | Delete a Product class | ||
| + | |||
| + | To delete a product class : | ||
| + | |||
| + | #Click on the BOM tab from the menu on the bottom [[File:Screenshot_2021-05-06_13-06-42.png]] | ||
| + | #Choose the Tree view which provides a better overview of the defined product classes and variants | ||
| + | #Choose the product class (Item type : ATO-MODEL) that you want to delete | ||
| + | #Click on “Delete” button from the right menu | ||
| + | |||
| + | [[File:Screenshot_2021-05-06_13-08-41.png]] | ||
| + | |||
| + | '''Note : The product class with its product versions will be deleted also from the Variants of products. Therefore, it is necessary to define them again as it is described in the sections 2.2, 2.3''' | ||
| + | |||
| + | Delete a Product variant | ||
| + | It is possible to delete a product variant from the Variant of products page. Simply choose the undesired product variant and use the trash bin button. Confirm with “Yes” to delete the selected row. | ||
| + | |||
| + | [[File:Screenshot_2021-05-06_13-10-58.png]] | ||
| + | |||
| + | Next, define the new product class with the desired name as it is described in section 2.3 | ||
| + | |||
| + | Edit the “Variant part ID name” of a product class | ||
| + | The name of “Variant part ID” of a product class can be edited from the BOM with the following procedure: | ||
| + | |||
| + | #Click on the BOM tab from the menu on the bottom [[File:Screenshot_2021-05-06_13-06-42.png]] | ||
| + | #Navigate to the material item-class (level 0) which includes the variant that you want to delete | ||
| + | #Choose the material item (level 1) which corresponds to the variant that you want to rename. | ||
| + | #From the list on the right, click on the button “Products with part” | ||
| + | #On the obtain window type the new name, click on the rename button and close the window | ||
| + | |||
| + | [[File:Screenshot_2021-05-06_13-18-22.png]] | ||
| + | |||
| + | '''Note : The above mentioned procedure will rename only the “Variant part ID” of the product variant, while the “Variant part name”, which is also stated in the printed labels, will remain the same. For this reason, this procedure is not recommended for product variants with a specified “Variant part name”.''' | ||
| + | |||
| + | |||
| + | == 3. CLEA configurations for material consumption == | ||
| + | |||
| + | *3.1 About material consumption (kanban production) | ||
| + | |||
| + | In the main assembly line, some stations can provide logistics information. More specifically, for the Shanghai plant the stations IP and P1 (pre-assembly) establish the pre-assembly line where the Kanban production takes place. | ||
| + | |||
| + | [[File:Screenshot_2021-05-06_13-24-30.png]] | ||
| + | |||
| + | For this reason the relevant operations which are connected with the station IP should be configured accordingly in CLEA as well as the relevant applications should also be synchronized with CLEA. The necessary CLEA configurations are presented in the following sections. | ||
| + | |||
| + | *3.2 Configure the operation of material consumption | ||
| + | |||
| + | In this CLEA configuration the specified product variant from “Variants of product” in BOM, should be defined as quality condition in the partcheck operation of the IP station. | ||
| + | |||
| + | To specify the necessary quality conditions: | ||
| + | #Click on Line configuration from the bottom menu | ||
| + | #Click on the relevant operation and in the obtain window define the product variants as quality conditions parameters | ||
| + | #Click on “Publish operation configuration” button | ||
| + | |||
| + | [[File:Screenshot_2021-05-06_13-27-36.png]] | ||
| + | |||
| + | 4. Add a note and click on “Publish” window | ||
| + | |||
| + | [[File:Screenshot_2021-05-06_13-29-54.png]] | ||
| + | |||
| + | 5. Then you can publish the Client application directly, or you can click on the application name in the terminal column later. | ||
| + | While publishing, in the obtained window add a note and choose on deploy “Refresh all products in Kernel”. In case you modified just quality conditions, it is not necessary to choose an option “Reload client (PLCHUP)”. | ||
| + | |||
| + | [[File:Screenshot_2021-05-06_13-32-25.png]] | ||
| + | |||
| + | *3.3 Connect product with operation | ||
| + | |||
| + | In addition, with the above mentioned operation configuration, the product which corresponds to the product variant, should also be connected with the partcheck operation. | ||
| + | For this CLEA configuration : | ||
| + | #Click on BOM tab from the bottom menu | ||
| + | #From the “Tree” view choose the relevant part ID (item with level 1) under the corresponding item class material with level 0 | ||
| + | #Click on the button “BoM to Operation” on the right side | ||
| + | |||
| + | [[File:Screenshot_2021-05-06_13-35-06.png]] | ||
| + | |||
| + | 4. Choose the relevant operation where the product has been defined as quality condition parameter and then click on “Assign selected” button | ||
| + | |||
| + | [[File:Screenshot_2021-05-06_13-36-34.png]] | ||
| + | |||
| + | The product ID is now connected with the partcheck operation | ||
| + | |||
| + | *3.4 Connect “Physical place material” with logistics application | ||
| + | |||
| + | In this CLEA configuration the established product variant added on Variants of products ( section 2.3 ) and the quality conditions of the relevant operation (section 3.2), should be connected with the logistics application. | ||
| + | |||
| + | To do so: | ||
| + | #Click on Transport tab from the bottom menu | ||
| + | #Click on the relevant physical place material and set the desired parameters | ||
| + | Delivery batch size: The size of the requested batch of products from the P1 station | ||
| + | Optimal batch amount: The maximum size of batches that can be processed from the supply chain | ||
| + | Delivery time (min.): This parameter is not used in your production. | ||
| + | #Link the relevant Physical place material, to the logistics application | ||
| + | |||
| + | [[File:Screenshot_2021-05-06_13-46-50.png]] | ||
| + | |||
| + | 4. Click on the logistics application, and then click the “Publish” button. | ||
| + | |||
| + | 5. Add a note and then click the “Publish” button again. | ||
| + | |||
| + | [[File:Screenshot_2021-05-06_13-48-37.png]] | ||
| + | |||
| + | |||
| + | *3.5 Data flow of material consumption process | ||
| + | |||
| + | This section gives an overview of how the information flows among the various services which run in both kernel and sql server. The following chart displays the involved services as well as the data flow among them before the final material consumption data will be saved in the database. | ||
| + | |||
| + | |||
| + | [[File:Screenshot_2021-05-12_08-38-36.png]] | ||
| + | |||
| + | |||
| + | |||
| + | == 4. FAQ == | ||
| + | |||
| + | *How to rename the “Variant part ID” of a product variant? | ||
| + | |||
| + | It is possible to rename the “Variant part ID” as it is described in section 2.4. However, it is not recommended to do so for product variants which have a specified “Variant part name” since this name can not be edited. In such a case, creating a new product variant is the ideal solution. | ||
| + | |||
| + | |||
| + | *How to rename the “Product ATO ID” of a product class? | ||
| + | |||
| + | Such a feature is not available in the CLEA application. Instead, It is recommended to create a new product class and then specify its product variants. See sections 2.2, 2.3 | ||
| + | |||
| + | |||
| + | *How to add a new product variant? | ||
| + | |||
| + | A new product variant can be added from the “Variants of products”. Choose the product class which will include the product variant and use the add button [[File:Screenshot_2021-05-06_08-51-34.png]]. See section 2.2 for the detailed description. | ||
| + | |||
| + | |||
| + | *How can I define a product variant with less variant part names? | ||
| + | |||
| + | Some product variants may include less part numbers compared with other product variants of the same product class. For instance the IP variant “IP-GEN-RHD” does not have an “Antenna-E-call-EU” part number. | ||
| + | |||
| + | [[File:Screenshot_2021-05-06_14-11-31.png]] | ||
| + | |||
| + | In order to define such product variants, in the BOM file specify as “OPTION-CLASS” the variant part name which is not common to all the product variants. | ||
| + | |||
| + | Open the “Tree” view in the BOM and choose the part ID that is optional among the variants. Set its item type as “OPTION-CLASS”. | ||
| + | |||
| + | [[File:Screenshot_2021-05-06_14-13-03.png]] | ||
| + | |||
| + | |||
| + | *How to add a new variant part number in the variant part name list? | ||
| + | |||
| + | To add a new variant part number choose the relevant product variant. From the right list of variant part names, choose the desired part name and click on the add button [[File:Screenshot_2021-05-06_08-51-34.png]]. Fill in the part id (mandatory), the part name and the other parameters (optional). Click the “Add new choice item” button. | ||
| + | |||
| + | [[File:Screenshot_2021-05-06_14-15-37.png]] | ||
Current revision as of 13:20, 12 August 2022
Contents |
1. Overview of Variants of products in BOM
An alternative method to create a Bill Of Material (BOM) file is by using the Assembly To Order (ATO) model. This type of BOM file is suitable for plants which produce products that differ in just a few part numbers (product variants) since it has a more user friendly interface compared with the BOM in the common style of list.
To create this kind of BOM, in CLEA from the bottom menu bar click on BOM options > Variants of products
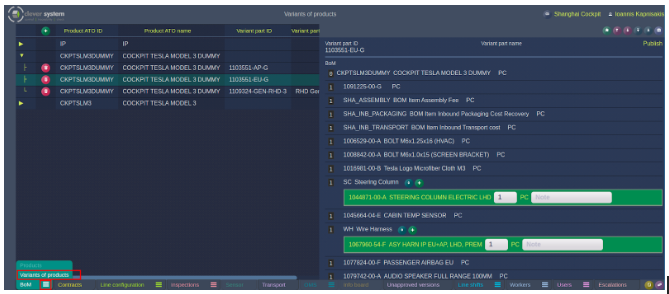
The page of “Variants of products” is displayed :
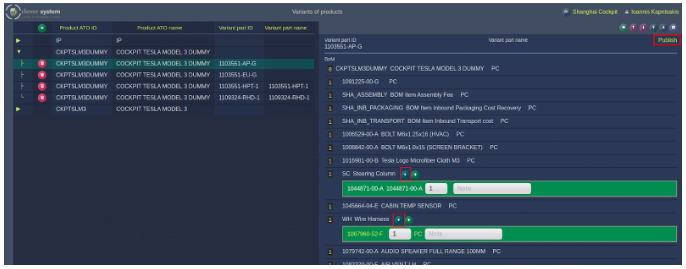
As can be seen from the image above the “Variants of products” page is divided in two parts. On the left part, it shows the various product ATO-models (referred also as product classes ) (IP, CKPTSLM3DUMMY, CKPTSLM3) and their corresponding product variants under each of them.
On the right part, with a green background, are listed the used part numbers for each product variant while the product numbers within dark blue background are the so called “constant” and they are used from all the product variants. In the following chapters, the necessary steps, in order to create this type of BOM, are presented.
2. Product classes and product variants
- 2.1 About product classes and product variants
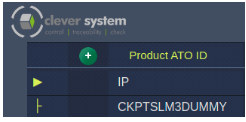
The product classes and product variants are both parts of the “Variants of products” of a BOM file. They specify the different products with their variants and they are displayed in a tree structure.
A product class is marked with the arrows ![]() . By clicking this arrow the list can be extended by displaying the individual “branches” marked with
. By clicking this arrow the list can be extended by displaying the individual “branches” marked with ![]() and
and ![]() that correspond to the product variants. The overall tree structure of a product class, found on “Variants of products”, is shown below.
that correspond to the product variants. The overall tree structure of a product class, found on “Variants of products”, is shown below.
- 2.2 Define a product ATO-Model
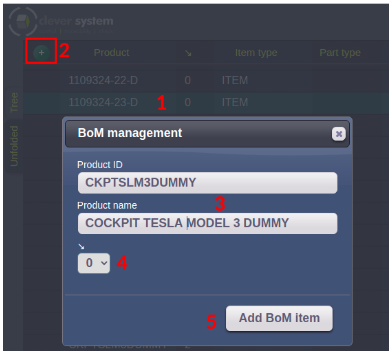
To define a product ATO-Model (product class), in the BOM file, click on the BOM tab from the bottom menu. ![]()
From the obtained list of the BOM file :
- Choose a record out of any other defined ATO-model.
- Use the add button
 on the top left side of the screen.
- Check that level is set to 0 and correct if necessary
- Give the desired “Product ID” and “Product name”
- Click the “Add BoM item” button to add the product class in the BOM file. The new BOM class will be added below the record that has been selected on step 1.
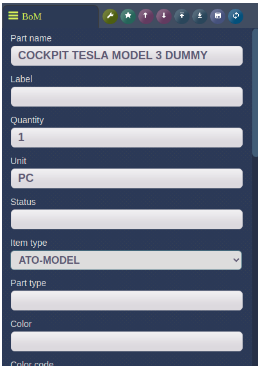
6. Choose the created product class and from the list on the right, set its item type as “ATO-MODEL”.
The new defined product class will also be imported in the “Variants of products” of the BOM, marked with the “branch” symbol ![]() .
.
After defining the product variants, for this new product class, the mark of the product class will change to the relevant one ![]() .
.
Note: The information stated under the column “Variant part name” is also printed in the labels.
- 2.3 Define a product variant
As mentioned before, the BOM file includes the product variants which are used in the production line during the assembly of cockpits. Such a definition can be executed from the “Variants of products” found in the BOM tab in CLEA bottom menu.
From the CLEA bottom menu, click on BOM options > Variants of products
Then :
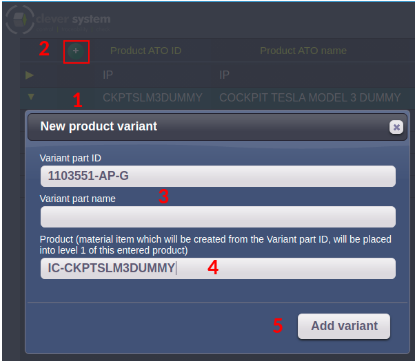
- Choose the desired product class which will include the product variant or an existing variant of the product class where you want to add the new variant.
- Use the add button
 on the top left side of the screen.
- Give the desired variant part ID and name for the product variant. (The “Variant part name” is optional and it will also be displayed in the printed labels).
- This field should contain the prefix “IC” with the name of the product class (Product ATO ID) which will contain the added product variant.
Here, a new product variant in CKPTSLM3DUMMY product class was added thus IC.CKPTSLM3DUMMY
5. Click the “Add variant” button to add the new product variant. The product variant will be added under the product class (the record) that has been chosen earlier on step 1
The new product variant will be added automatically in the BOM, as material item with level 1, under the material item-class IC.CKPTSLM3DUMMY.
6. In “Variants of products” choose the corresponding product variant and specify, by using the drop down button ![]() , the variant part names which are used from it. To add a new variant part name in the drop down list of a variant part name group, use the add button
, the variant part names which are used from it. To add a new variant part name in the drop down list of a variant part name group, use the add button ![]() .
.
- 2.4 Publish variants of products into Clever MES
After the definition of product variants in CLEA, this data should be exported into the Clever Manufacturing Execution System (MES). Then, the newly published configuration will be used on the Kernel server for the production of dummy cockpits that will start according to the requested type of cockpit from Tesla.
From the system point of view, the above procedure corresponds to the creation of .json files on the HV station, which include the production information (i.e. variant part names, used part numbers) for each cockpit under assembly.
To generate these .json files :
1. From the CLEA bottom menu, click in BOM options > Variants of product 
2. Choose a product class and click the button “Export variants of products into Clever MES” on the right side.
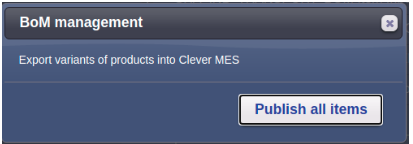
Alternatively, choose a product variant and click on “Publish” on the top right corner
Confirm the publish by clicking on the “Publish all items” in the obtained window.
Note: This will publish the BOM configurations of all product classes and product variants. There is no option to publish for an individual product variant or product class.
The generated .json files will be exported in a zip form (ProductVariants.zip) in the kernel under the directory usr/local/plc/clea/repo/plcshakrnl:<main kernel of line> , where <main kernel of line> : 7789 for M3 line 7787 for MY line
3. In a final step the cockpit ID label is scanned in the HV station. This enables a process which automatically copies and unzip the zipped file of product variants (ProductVariants.zip) in the kernel under the directory
/usr/local/plc/etc/pmc/product_variants/plcshakrnl:<main kernel of line> , where main kernel of line : 7789 for M3 line 7787 for MY line
Via this procedure the information from the BOM file is loaded in the main kernel of the assembly line.
- 2.5 Edit and delete product class and product variant
Edit the “Product ATO ID” name
Delete a Product class
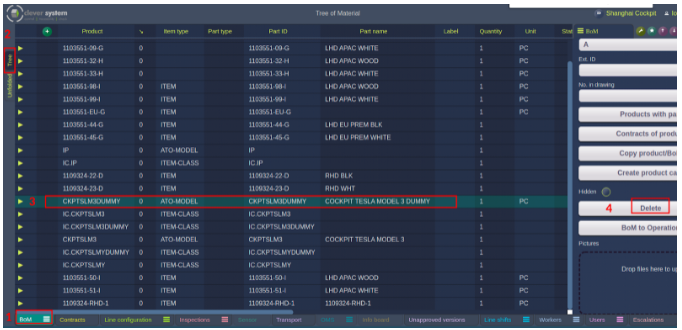
To delete a product class :
- Click on the BOM tab from the menu on the bottom

- Choose the Tree view which provides a better overview of the defined product classes and variants
- Choose the product class (Item type : ATO-MODEL) that you want to delete
- Click on “Delete” button from the right menu
Note : The product class with its product versions will be deleted also from the Variants of products. Therefore, it is necessary to define them again as it is described in the sections 2.2, 2.3
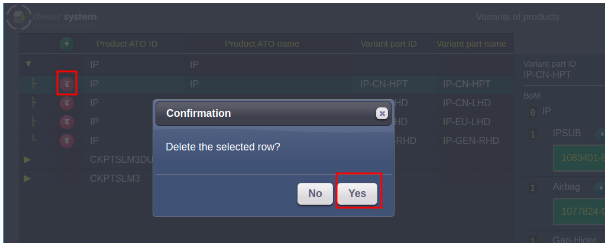
Delete a Product variant It is possible to delete a product variant from the Variant of products page. Simply choose the undesired product variant and use the trash bin button. Confirm with “Yes” to delete the selected row.
Next, define the new product class with the desired name as it is described in section 2.3
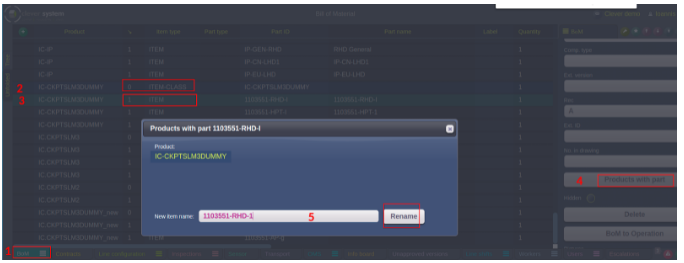
Edit the “Variant part ID name” of a product class The name of “Variant part ID” of a product class can be edited from the BOM with the following procedure:
- Click on the BOM tab from the menu on the bottom

- Navigate to the material item-class (level 0) which includes the variant that you want to delete
- Choose the material item (level 1) which corresponds to the variant that you want to rename.
- From the list on the right, click on the button “Products with part”
- On the obtain window type the new name, click on the rename button and close the window
Note : The above mentioned procedure will rename only the “Variant part ID” of the product variant, while the “Variant part name”, which is also stated in the printed labels, will remain the same. For this reason, this procedure is not recommended for product variants with a specified “Variant part name”.
3. CLEA configurations for material consumption
- 3.1 About material consumption (kanban production)
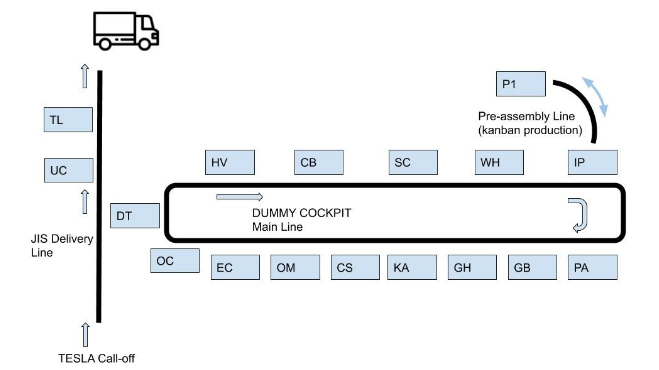
In the main assembly line, some stations can provide logistics information. More specifically, for the Shanghai plant the stations IP and P1 (pre-assembly) establish the pre-assembly line where the Kanban production takes place.
For this reason the relevant operations which are connected with the station IP should be configured accordingly in CLEA as well as the relevant applications should also be synchronized with CLEA. The necessary CLEA configurations are presented in the following sections.
- 3.2 Configure the operation of material consumption
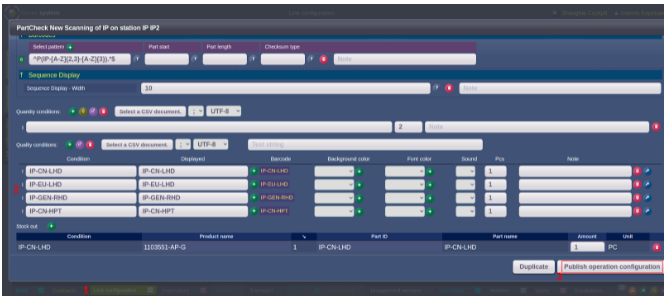
In this CLEA configuration the specified product variant from “Variants of product” in BOM, should be defined as quality condition in the partcheck operation of the IP station.
To specify the necessary quality conditions:
- Click on Line configuration from the bottom menu
- Click on the relevant operation and in the obtain window define the product variants as quality conditions parameters
- Click on “Publish operation configuration” button
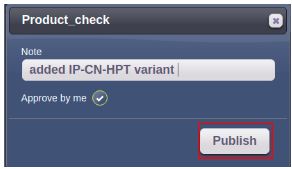
4. Add a note and click on “Publish” window
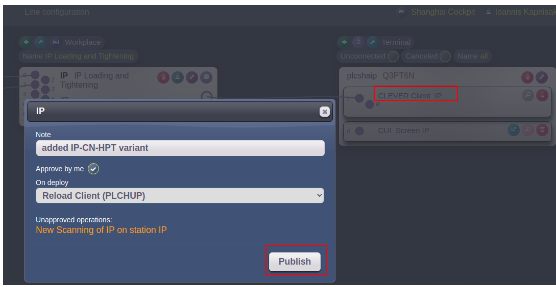
5. Then you can publish the Client application directly, or you can click on the application name in the terminal column later. While publishing, in the obtained window add a note and choose on deploy “Refresh all products in Kernel”. In case you modified just quality conditions, it is not necessary to choose an option “Reload client (PLCHUP)”.
- 3.3 Connect product with operation
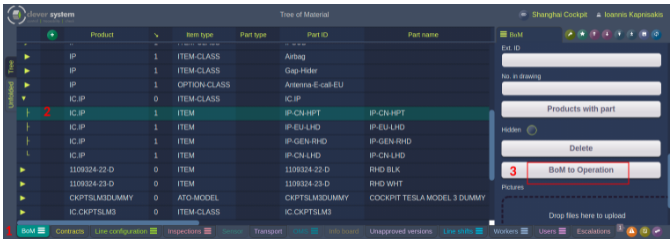
In addition, with the above mentioned operation configuration, the product which corresponds to the product variant, should also be connected with the partcheck operation. For this CLEA configuration :
- Click on BOM tab from the bottom menu
- From the “Tree” view choose the relevant part ID (item with level 1) under the corresponding item class material with level 0
- Click on the button “BoM to Operation” on the right side
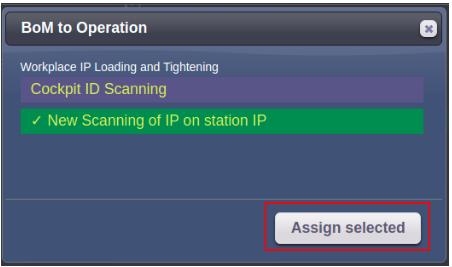
4. Choose the relevant operation where the product has been defined as quality condition parameter and then click on “Assign selected” button
The product ID is now connected with the partcheck operation
- 3.4 Connect “Physical place material” with logistics application
In this CLEA configuration the established product variant added on Variants of products ( section 2.3 ) and the quality conditions of the relevant operation (section 3.2), should be connected with the logistics application.
To do so:
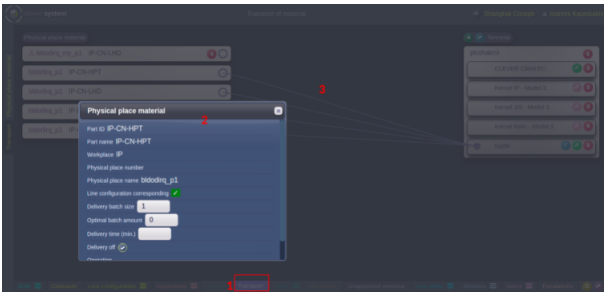
- Click on Transport tab from the bottom menu
- Click on the relevant physical place material and set the desired parameters
Delivery batch size: The size of the requested batch of products from the P1 station Optimal batch amount: The maximum size of batches that can be processed from the supply chain Delivery time (min.): This parameter is not used in your production.
- Link the relevant Physical place material, to the logistics application
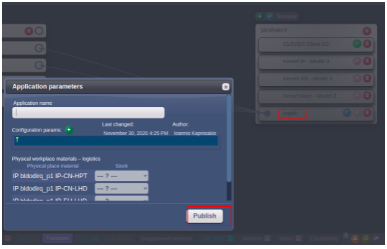
4. Click on the logistics application, and then click the “Publish” button.
5. Add a note and then click the “Publish” button again.
- 3.5 Data flow of material consumption process
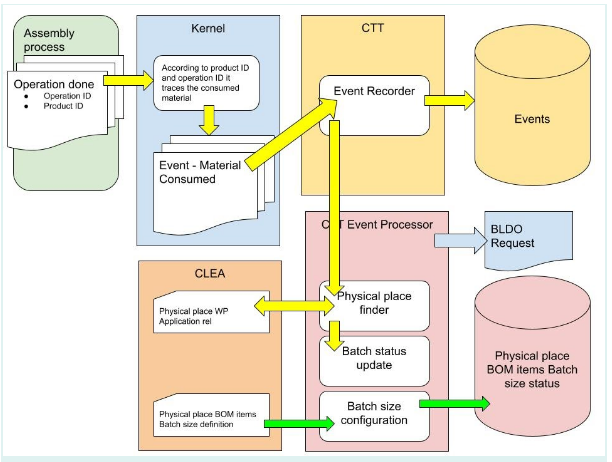
This section gives an overview of how the information flows among the various services which run in both kernel and sql server. The following chart displays the involved services as well as the data flow among them before the final material consumption data will be saved in the database.
4. FAQ
- How to rename the “Variant part ID” of a product variant?
It is possible to rename the “Variant part ID” as it is described in section 2.4. However, it is not recommended to do so for product variants which have a specified “Variant part name” since this name can not be edited. In such a case, creating a new product variant is the ideal solution.
- How to rename the “Product ATO ID” of a product class?
Such a feature is not available in the CLEA application. Instead, It is recommended to create a new product class and then specify its product variants. See sections 2.2, 2.3
- How to add a new product variant?
A new product variant can be added from the “Variants of products”. Choose the product class which will include the product variant and use the add button ![]() . See section 2.2 for the detailed description.
. See section 2.2 for the detailed description.
- How can I define a product variant with less variant part names?
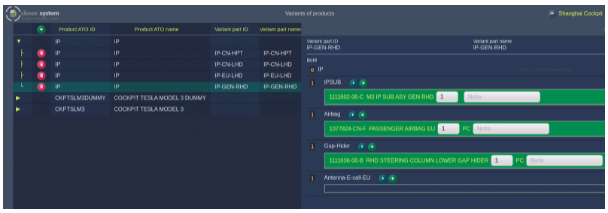
Some product variants may include less part numbers compared with other product variants of the same product class. For instance the IP variant “IP-GEN-RHD” does not have an “Antenna-E-call-EU” part number.
In order to define such product variants, in the BOM file specify as “OPTION-CLASS” the variant part name which is not common to all the product variants.
Open the “Tree” view in the BOM and choose the part ID that is optional among the variants. Set its item type as “OPTION-CLASS”.
- How to add a new variant part number in the variant part name list?
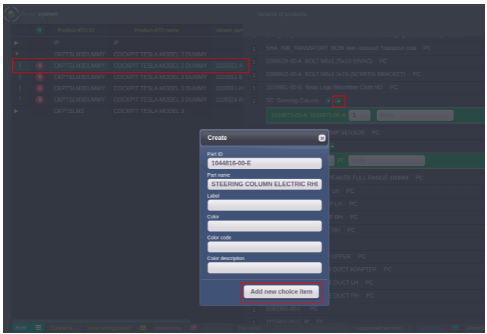
To add a new variant part number choose the relevant product variant. From the right list of variant part names, choose the desired part name and click on the add button ![]() . Fill in the part id (mandatory), the part name and the other parameters (optional). Click the “Add new choice item” button.
. Fill in the part id (mandatory), the part name and the other parameters (optional). Click the “Add new choice item” button.
